Do Muscles Grow During Your Workout or After It?
Ask ten dedicated home gym users this question and at least seven will say “during.” It feels right — you push hard, the pump hits, and you leave feeling like you’ve built something.
They are wrong. And this single misunderstanding is why millions of home gym setups produce far slower results than they should.
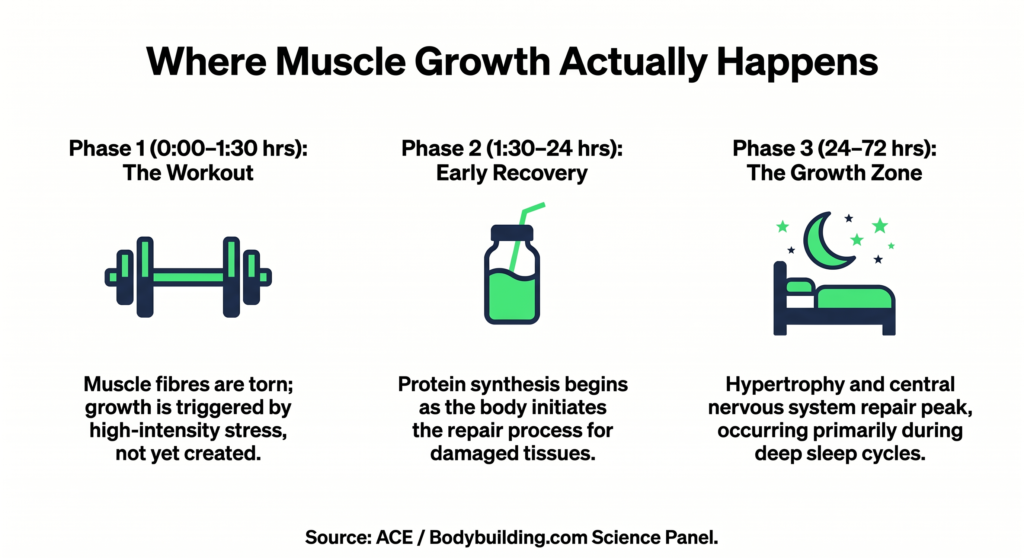
According to the American Council on Exercise, muscle repair and growth begin after you stop training — during rest periods, not during the workout itself. Your workout creates microscopic tears in muscle fibers. The inflammation, repair, and protein synthesis that rebuild them stronger happen in the 24 to 72 hours that follow, primarily during sleep. At high intensities (85%+ of your max), your central nervous system alone may need 72 hours or more to fully recover, even when your muscles feel fine.
The gym is where you trigger growth. Your recovery zone is where growth actually happens.
This is why recovery zones — once seen only in commercial gyms and elite sports facilities — are being called the next big thing in home fitness for 2026 by Men’s Health, Women’s Health, and the American College of Sports Medicine. This guide is built specifically for home gym users — especially those in small spaces and apartments — who want to build one without a renovation budget.
Quick Answer: A home gym recovery zone is a dedicated space for post-workout repair — combining tools like foam rollers, massage guns, stretching mats, and (optionally) cold or heat therapy. You can build a functional one in as little as 6×4 feet for under $150. The goal is not luxury; it is making recovery intentional rather than accidental.
Do I Really Need a Recovery Zone in My Home Gym?
If you are training more than two days per week and wondering why progress has stalled, the answer is almost certainly yes.
The ACSM’s 2026 Worldwide Fitness Trends report ranked recovery and wellness integration among the top fitness priorities — not for gym operators, but for individual exercisers. The science is straightforward: strength gains require at least 48 hours of recovery between sessions targeting the same muscle group. For beginners, two to three rest days per week is standard. Advanced lifters who train five or six days manage this by cycling muscle groups — but even they depend entirely on recovery quality, not just training volume.
Here is the practical gap most home gym users fall into: they build a dedicated workout area, buy progressively better equipment, and optimize every aspect of their training — then “recover” by sitting on the couch, scrolling, sleeping poorly, and wondering why they are always sore or stuck.
A recovery zone does not need to be large or expensive. What it needs to be is intentional. Designating even a corner of your home gym space for recovery changes behavior. When the mat, roller, and massage gun are visible and accessible, you use them. When they are in a bag under the bench, you skip them.
The commercial fitness industry already understood this years ago. Now the technology and affordability have made it fully viable at home.
How Much Space Do You Need for a Home Gym Recovery Zone?
This is one of the most searched questions in the home gym space — and the answer surprises most people.
Minimum functional space: 6 feet × 4 feet (roughly 24 sq ft). This is enough for a full-length yoga mat, a foam roller, and space to lie flat and stretch in any direction. If that is what you have, you have enough.
For a more complete setup with a massage gun station and a cold therapy option, 8 feet × 6 feet becomes comfortable. This is a corner, a spare wall, or a fold-away area in a bedroom.
For anyone building in a dedicated spare room or garage, a 10 feet × 8 feet zone allows for a portable infrared sauna panel, a cold plunge option, and full mobility work without rearranging anything.
The key insight from interior design and gym layout research is that recovery zones should be placed near natural light where possible — windows and softer lighting actively support the parasympathetic nervous system (rest-and-digest mode) that drives recovery. Keep the recovery corner away from mirrors and hard overhead lighting, which mentally signal exertion. A dim corner with a lamp and a mat is physiologically better for cooldown than a bright open floor space.
If you are in an apartment and already thinking about noise from your training side, take a look at our Apartment Gym Noise Checker — noise levels are relevant for recovery too, since lower acoustic stimulation during foam rolling and breathing work gives better results.
What Equipment Do You Need for a Home Gym Recovery Zone?
You do not need everything at once. This is a tiered framework built for real budgets.
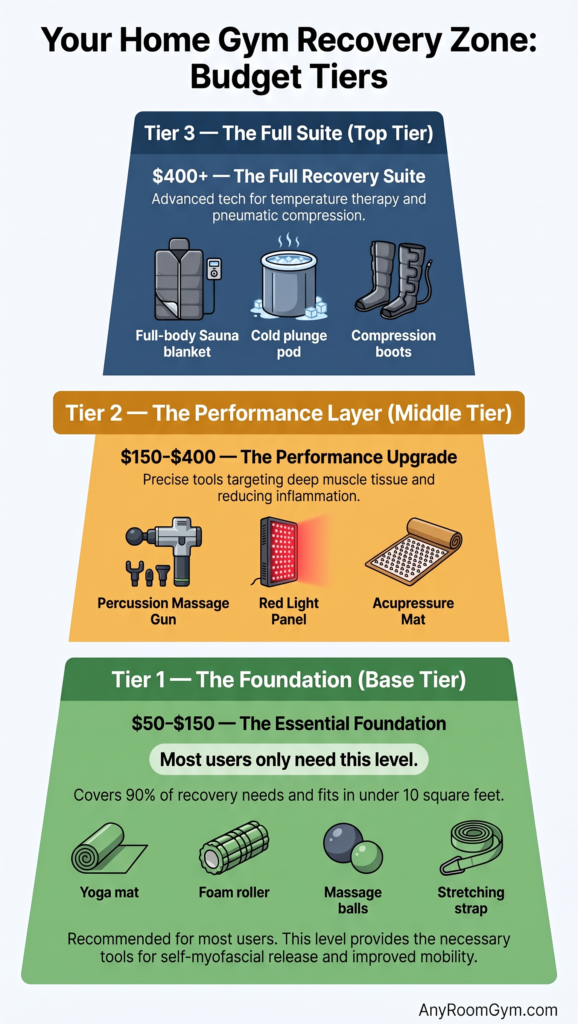
Tier 1 — The Essential Foundation ($50–$150)
Everything below is usable in under 10 square feet, stores flat, and covers 90% of what most people need.
- Thick yoga or exercise mat (at least 6mm, preferably 8–10mm): The literal foundation for all floor-based recovery work. Look for high-density foam or TPE material. ($20–$40)
- Standard foam roller (medium density): Used for self-myofascial release — rolling major muscle groups post-workout to improve circulation and reduce soreness. Research consistently shows reduced DOMS perception and improved range of motion when used 2–3 times per week. ($15–$30)
- Massage balls / lacrosse balls: Two to three balls cover what rollers cannot — the glutes, hip flexors, feet, and upper back along the spine. ($10–$20)
- Stretching strap: Deepens static stretches beyond what unaided flexibility allows, particularly for the hamstrings, hips, and calves. ($8–$15)
- Resistance bands (light set): Used for joint mobility and activation work during recovery sessions — not the same bands you train with. ($15–$25)
Total Tier 1: $68–$130. This is the complete functional recovery zone for most home gym users.
Tier 2 — The Performance Upgrade ($150–$400)
- Percussion massage gun (entry to mid-range): Theragun Mini, Hyperice Hypervolt Go, or comparable devices. Faster and more precise than manual foam rolling for targeting deep muscle tissue. Look for at least 3 speed levels and 16mm amplitude. ($80–$180)
- Acupressure mat and pillow: Studied for reducing muscle tension, cortisol, and sleep latency. 15–20 minutes of lying on the mat post-workout has measurable calming effects via pressure-point stimulation. ($30–$70)
- Compression sleeves or socks: Passive recovery during downtime. Effective for leg-day recovery and particularly useful if you sit or stand for long periods after lower-body training. ($20–$50)
- Red light therapy panel (entry-level): Now available under $100 for compact panels. Red and near-infrared wavelengths have peer-reviewed support for reducing inflammation and improving muscle recovery time. ($60–$120)
Tier 3 — The Full Recovery Suite ($400+)
- Portable infrared sauna blanket or pod: Purpose-built for small spaces. Models like the HigherDose Sauna Blanket fold to duffle-bag size and produce core-temperature increases comparable to a full sauna without a dedicated room. ($200–$500)
- Cold plunge alternative for apartments: A full cold plunge tub is a 2026 commercial gym trend, but for apartment users the practical option is an inflatable cold plunge pod (portable, under-bed storage, fills from any tap), a cold shower protocol (30–60 seconds of cold water post-workout reduces perceived soreness), or targeted ice pack rotation on major muscle groups. A genuine inflatable portable cold plunge starts around $150–$300.
- NormaTec compression boots or comparable leg recovery system: Used by elite athletes and increasingly affordable for home users ($300–$500 for entry models). Pneumatic compression accelerates venous return and reduces fluid buildup in the lower body after intense leg sessions.
What Is the Difference Between Active Recovery and Passive Recovery?
This is a genuinely important distinction that most home gym content glosses over.
Passive recovery means doing nothing specific to aid the process — sleeping, sitting, resting. It works, but it is the slowest mechanism available to you.
Active recovery means low-intensity movement that keeps circulation elevated without creating new training stress. Research consistently shows active recovery reduces DOMS more effectively than passive rest because increased blood flow accelerates the clearance of metabolic byproducts from muscle tissue.
For home gym users, the single most practical and evidence-backed form of active recovery is Zone 2 cardio — sustained, low-intensity cardiovascular effort where you can hold a conversation, typically corresponding to 60–70% of maximum heart rate. A 20–30 minute walk, a slow cycling session, or a light walking pad session the day after a heavy workout is more effective recovery than a rest day spent completely sedentary.
This is also where the overlap between your cardio setup and your recovery zone becomes valuable. If you have a walking pad — particularly if you use it at your desk — you already have a world-class active recovery tool. A 20-minute Zone 2 walk at 2–2.5 mph the morning after leg day does more for recovery than any supplement. Use our Zone 2 Walking Speed Calculator to find the exact pace that keeps you in the right heart rate range.
For a full guide to the WFH active recovery setup, see our Walking Pad Desk Setup Guide 2026.
How Does HRV Help You Know When to Rest?
Heart rate variability (HRV) is the variation in time between consecutive heartbeats, controlled by your autonomic nervous system. A higher HRV reading relative to your personal baseline means your parasympathetic system is dominant — you are recovered and ready to train. A lower HRV reading means your sympathetic system is elevated — stress, fatigue, or incomplete recovery is present.
A 2025 validation study published in Physiological Reports confirmed that consumer wearables are now clinically meaningful for HRV tracking: the Oura Ring Gen 4 achieved 99% concordance with ECG for nighttime HRV, and WHOOP 4.0 reached 94%. This is a major practical shift — you no longer need a lab to make data-driven recovery decisions.
How to apply this in a home gym context:
- Track your HRV every morning before leaving bed for 7–14 days to establish your personal baseline.
- When your HRV is 10% or more below your rolling average, this is a signal to shift from high-intensity training to an active recovery session, mobility work, or a full rest day.
- Do not respond to a single low-HRV reading. Use a rolling 3–7 day average, as single-night data is affected by alcohol, late eating, sleep disruption, or illness.
The practical decision rule is simple: on a low-HRV day, use your recovery zone instead of your training floor. You will not lose gains. You will avoid the overtraining plateau that derails most consistent home gym users within the first year.
Can You Have a Recovery Zone in an Apartment?
Yes — and the apartment context actually makes the recovery zone more valuable, not less.
Apartment home gym users face real constraints: noise floors (both creating noise and hearing it), limited space, and equipment that needs to disappear after use. The recovery zone specifically suits all three of these constraints.
Noise: Recovery tools are almost entirely silent. Foam rolling, stretching, massage guns (low vibration level), and breathing work create essentially zero impact sound — the exact opposite of the apartment gym training side, which needs floor protection and noise management. If your neighbors have ever knocked on the wall during your workout, your recovery zone is your compensation offering. For a scientific breakdown of which training activities transmit noise and which do not, our Apartment Gym Noise Checker gives you floor-by-floor impact projections.
Space: A recovery zone in an apartment can fold away completely. A rolled mat behind the sofa, a massage gun in the bedside drawer, and a stretching strap hanging on a hook represent zero daily footprint and full functional recovery access.
Cold therapy in an apartment: The full cold plunge is not apartment-friendly. The practical cold exposure protocol for apartment users: a cold shower finishing protocol (30–60 seconds of cold water at the end of your regular shower), face immersion (15–30 seconds in a bowl of cold water activates the diving reflex and measurably reduces acute stress response), or targeted ice packs on major muscle groups for 10–15 minutes post-workout. All have documented physiological effects and require nothing that would concern a landlord.
Are Cold Plunges Actually Worth It for Home Gym Users?
The evidence supports cold water immersion for specific outcomes: reduced perceived muscle soreness (DOMS), faster clearance of inflammatory markers, improved mood and mental alertness, and measurable immune system activation. A meta-analysis in PLOS ONE across 3,177 participants found significant stress reduction and a 29% drop in sickness absence among regular cold exposure practitioners.
The honest caveat from a medical student’s perspective: the research on cold exposure and muscle hypertrophy is more complicated. Some evidence suggests very cold immersion immediately after resistance training may blunt some of the anabolic signaling that drives muscle growth — the acute inflammatory response that cold suppresses is part of the muscle adaptation mechanism. The current practical recommendation from sports medicine literature is:
- For strength/hypertrophy goals: Use cold exposure on non-training days or wait 4–6 hours post-resistance training before cold immersion.
- For recovery from high-volume or endurance sessions: Cold exposure is highly beneficial and has no meaningful hypertrophy downside.
- For stress management and mood: Cold exposure at any time is beneficial regardless of training context.
For apartment users, inflatable portable cold plunge pods start under $150 and fill from a standard bathroom tap. Budget-friendly, no permanent installation, no plumbing required.
Do Infrared Saunas Help with Muscle Recovery?
The short answer is yes — with meaningful caveats on which type and how.
Infrared saunas heat the body differently from traditional steam saunas: near-infrared and mid-infrared wavelengths penetrate 2–3 centimeters beneath the skin surface, raising tissue temperature more efficiently at lower ambient air temperatures (typically 120–140°F versus 175–195°F for traditional saunas). The physiological outcomes relevant to home gym recovery include:
- Increased blood flow to muscles, accelerating oxygen delivery and waste product clearance
- Reduced inflammatory markers and perceived soreness
- Improved sleep onset and sleep quality (relevant given that growth hormone — the primary driver of overnight muscle repair — is released in the first sleep cycles)
- Measurable reduction in cortisol with regular sessions
For small-space home gym users, infrared sauna blankets and pods are the practical format. They weigh under 15 pounds, store in a duffel bag, draw standard 110V household power, and require no installation. A 20–30 minute session 2–3 times per week is the studied effective protocol.
How Do I Use a Foam Roller Properly for Recovery?
This is the most commonly asked recovery tool question — and also the most commonly answered incorrectly. Rolling fast and aggressively over sore spots is not effective technique.
The science-backed protocol:
- Roll slowly — approximately 1 inch per second. The purpose is mechanical pressure sustained long enough to create a neurological release in the fascia, not a massage stroke.
- Pause on tender spots — when you find a point of elevated tension (not sharp pain), hold pressure for 20–30 seconds until the sensation reduces by approximately 50%. This is the myofascial release mechanism.
- Apply longitudinal rolling after pausing — once the spot releases, slowly roll 2–3 inches in each direction from that point.
- Sequence by body part: Start with the calves, work up through the hamstrings, IT band, glutes, thoracic spine (upper back), and lats. The lower body accounts for the majority of recovery-relevant trigger points for most gym training patterns.
- Duration per muscle group: 60–90 seconds per area is sufficient. A complete full-body rolling session takes 10–12 minutes.
- Timing: Both pre-workout (to improve range of motion without reducing strength) and post-workout (to reduce DOMS onset) are effective. Most recovery-focused users integrate it into their cooldown.
Avoid rolling directly on joints (knees, elbows, hips), the lower spine (lumbar region), and any area of acute injury. Foam rolling is a wellness tool, not a substitute for physiotherapy in the context of genuine injury.
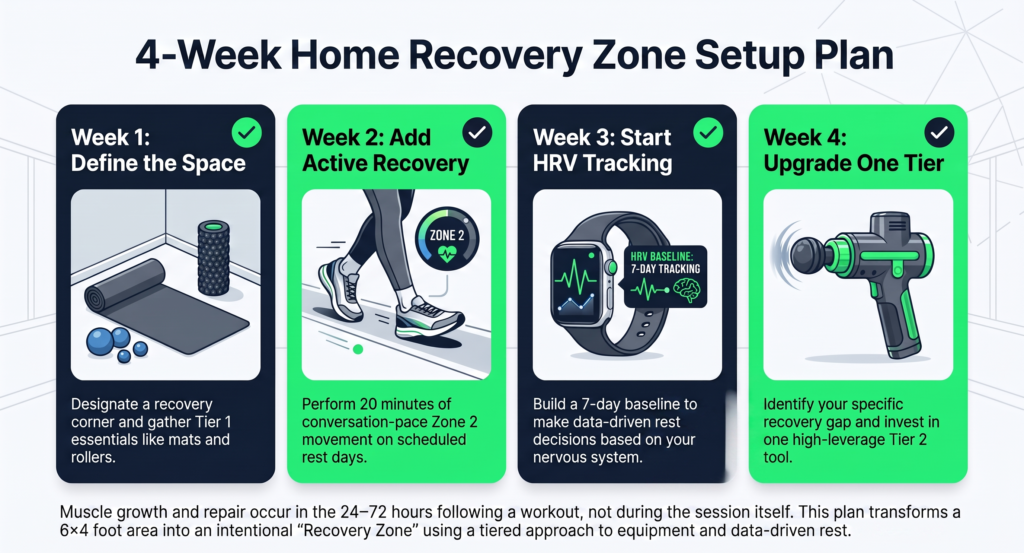
Building Your Home Gym Recovery Zone: The 4-Week Setup Plan
This is the practical framework for anyone starting from zero.
Week 1 — Define the space and set the foundation.
Designate your recovery corner. It needs only a mat-sized footprint. Purchase or locate a yoga mat, one foam roller, and two massage balls. Commit to 10 minutes of active recovery work every training day for seven days.
Week 2 — Add the active recovery layer.
Establish a Zone 2 walking protocol on rest days. Twenty minutes at conversation-pace effort, either outside or on a walking pad. Track how your soreness level compares to previous weeks without this protocol. Most users report a measurable difference within the first two cycles.
Week 3 — Introduce HRV tracking.
If you have an Oura Ring, WHOOP, or any compatible smartwatch, activate HRV tracking and spend seven days building your baseline. Begin making one training decision per week based on the data — either adding an extra rest day or confirming a training day.
Week 4 — Evaluate and upgrade one tier.
Based on where you feel the gap most (soreness, sleep quality, mental recovery, specific muscle tightness), invest in one Tier 2 tool. A percussion massage gun is the single highest-leverage Tier 2 upgrade for most users.
Want to see whether your full home gym investment is paying off? Our Home Gym ROI Calculator factors in equipment cost, gym membership savings, and training frequency to give you a real-dollar return picture.
Frequently Asked Questions
Q: How small can a home gym recovery zone be?
A: A functional recovery zone requires as little as 6×4 feet — enough for a full-length mat and foam roller. You do not need a dedicated room. A corner of your existing training space works well.
Q: Can I build a recovery zone for under $100?
A: Yes. A thick exercise mat ($25), a foam roller ($20), two lacrosse balls ($10), and a stretching strap ($12) gives you a complete Tier 1 recovery setup for approximately $67. This covers the full evidence-based toolkit for reducing DOMS and improving mobility.
Q: What is the best recovery tool for a home gym in 2026?
A: For most users, the combination of a foam roller (for daily myofascial release), a percussion massage gun (for targeted deep tissue work), and a structured active recovery protocol (Zone 2 walking) produces more measurable results than any single premium tool.
Q: Is a cold plunge necessary for a home gym recovery zone?
A: No. Cold exposure has clear benefits for certain recovery goals, but it is a Tier 3 tool. A cold shower protocol (30–60 seconds cold water after your regular shower) delivers a meaningful portion of the benefits at zero cost and requires no dedicated space.
Q: How long should a recovery session in a home gym take?
A: A minimum effective recovery session is 10–12 minutes of foam rolling plus 5 minutes of targeted stretching. A full session — including foam rolling, massage gun work, and breathwork — takes 20–25 minutes. Active recovery (Zone 2 walking) adds 20–30 minutes on separate days.
Q: Does recovery equipment replace rest days?
A: No. Recovery tools accelerate the repair process, but they do not replace the need for adequate sleep (7–9 hours for most adults), protein intake (1.6–2.2g/kg/day for muscle synthesis), and reduced training volume on non-intensive days. Recovery tools make your rest days more productive — they do not make them unnecessary.